

How to Use BFR Bands | Crucial Tips for First Timers
If you're visiting this blog, you've likely heard of BFR, or Blood Flow Restriction training. Its also likely that you're interested in learning more about BFR and how to use BFR bands or cuffs for training and rehabilitation for the first time.
BFR training is when you place cuffs or bands around a limb during exercise to maintain arterial inflow to the muscle while at the same time preventing venous return of the blood to the heart.
What Are BFR Bands?
BFR bands, short for Blood Flow Restriction bands, are specialized cuffs or straps used to partially restrict blood flow to a limb during exercise. The goal is to limit venous return (the blood flow leaving the muscle) while allowing arterial inflow (the blood entering the muscle), creating a low-oxygen environment that simulates the effects of heavy lifting, even with very light weights.
This triggers a cascade of physiological responses:
-
Increased muscle fiber recruitment
-
Elevated growth hormone and IGF-1 levels
-
Enhanced metabolic stress
-
Accelerated strength and muscle growth with lower risk of joint strain
BFR bands are typically used on the upper arms or upper thighs, depending on the muscle group being trained. When applied properly, they can be a game-changing tool for:
-
Beginners looking to build muscle without heavy loads
-
Athletes recovering from injury
-
Older adults maintaining strength safely
-
Rehab patients easing back into resistance training
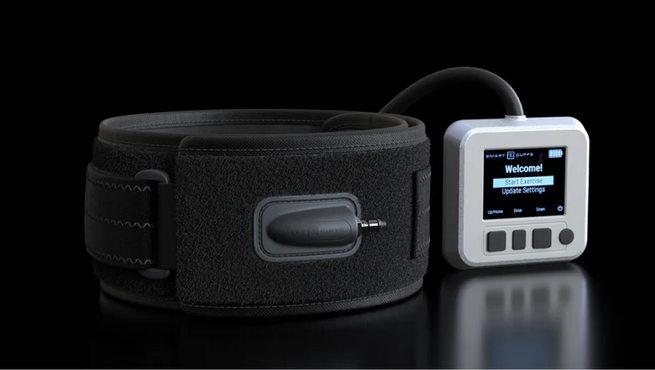
At Smart Tools, our SmartCuffs™ go beyond basic bands by using calibrated pressure, Bluetooth monitoring, and clinician-grade safety features, making BFR training more effective, personalized, and secure than ever before.
Guide to Using BFR Bands For The First Time
If you're new to using BFR bands, it's important to start with a clear understanding of how they work, how to apply them properly, and how to ease into your first training sessions safely. This beginner's guide will walk you through each step so you can feel confident and get results — without risking injury or discomfort.
Step 1: Choose the Right BFR Equipment
Before anything else, you’ll need to decide whether to use BFR cuffs or elastic bands. Here's the key difference:
-
Elastic BFR bands are simple, inexpensive, but hard to regulate precisely. They often rely on guesswork, which increases the risk of wrapping too tightly or too loosely.
-
SmartCuffs™ from Smart Tools use regulated pressure, customized limb occlusion percentages, and Bluetooth-enabled monitoring — making them a safer, more effective option, especially for beginners and rehab users.
Pro Tip: For first-time users, we strongly recommend starting with a cuff-based system like SmartCuffs™ for safety, accuracy, and ease of use.
Step 2: Warm Up Before Applying the Cuffs
A proper warmup helps increase blood flow and prepares the muscles for low-load training under BFR conditions.
-
Perform 5–10 minutes of light cardio (e.g., walking, cycling, arm swings).
-
Follow that with 1–2 light sets of 15 reps of the exercises you plan to perform — without the cuffs — to activate the target muscles and assess how your body feels.
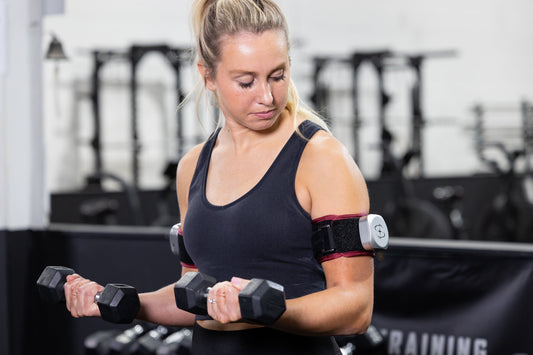
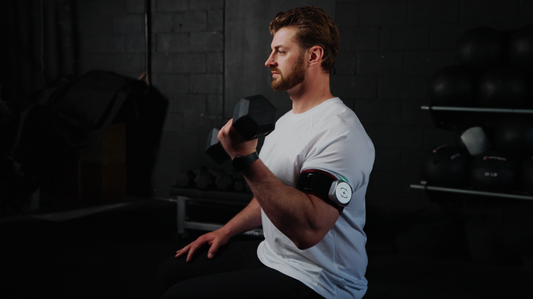
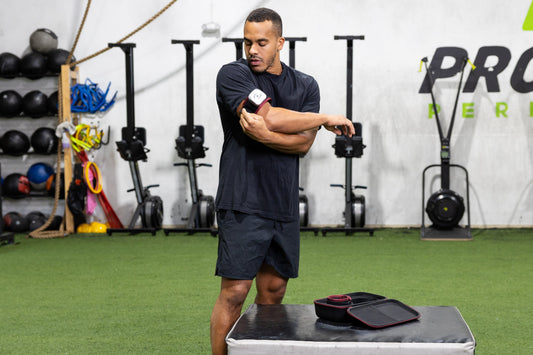
Step 3: Proper BFR Cuff Placement
Once you’re warmed up, it’s time to apply your cuffs:
-
For arm exercises: Place the cuff high on the upper arm, just below the deltoid.
-
For leg exercises: Place the cuff at the top of the thigh, close to the groin area.
Do not place cuffs directly over joints, like the elbow or knee, or on the forearms or calves. This can restrict blood flow improperly and increase injury risk.
SmartCuffs™ take the guesswork out by guiding you to the correct position and regulating pressure based on limb size.
Step 4: Set the Correct Pressure
-
For upper body training, aim for 40–50% of Limb Occlusion Pressure (LOP).
-
For lower body, use 60–80% LOP.
If you're using SmartCuffs™, the system will calculate and apply the appropriate pressure using built-in sensors — no manual adjusting required.
Using elastic bands? Tighten them to a perceived pressure of 7/10 for legs and 5/10 for arms — just tight enough to feel firm but not painful. If you experience tingling, numbness, or discoloration, remove the band immediately.
Step 5: Start With Light Loads
The power of BFR is that you don’t need heavy weights to stimulate growth. In fact, research shows that 20–30% of your 1-rep max is all you need.
Your first BFR workout might look like this:
-
Choose 1–3 exercises for the target muscle group
-
Perform the standard BFR protocol:
-
30 reps → 30 sec rest
-
15 reps → 30 sec rest
-
15 reps → 30 sec rest
-
15 reps → Done
-
Total: 75 reps per exercise
Step 6: Listen to Your Body
BFR training will feel different. Expect:
-
A strong “burn” or muscle pump
-
Temporary redness or fullness in the limb
-
Fatigue setting in faster than usual
You should not experience:
-
Numbness
-
Tingling
-
Sharp pain
-
Skin discoloration
If you do, release the cuff, reassess your setup, and consider using a regulated system like SmartCuffs™ for a safer experience.
By following these steps and starting conservatively, you’ll be setting yourself up for safe, effective progress with BFR. And with Smart Tools, you can trust that your BFR training is backed by science, built for precision, and designed to grow with you — from first-timer to full-on pro.
Dos and Dont's of BFR
Do lift much lighter weights than you think you need. One of the primary advantages of BFR training is that you can train by lifting lighter loads at a lower intensity. However, when lifting lighter weights at a lower intensity, you do want to perform more reps and longer sets with shorter rest periods in between.
Don't be afraid to start slow. In other words, dont overdo it. This is a very real temptation when beginning a new training program or strategy. Most patients or athletes get excited and want to go all-in and see results immediately. Those results will come soon enough. But as a beginner, its critical to listen to your body, take it slow, and take breaks if needed. Work your way up to longer sets.
How Do You Know If BFR Is for You?
BFR training benefits a wide range of people. Those who have mobility issues, such as those who are in a cast, bed-ridden, elderly, or post-op, will benefit.
As you begin your BFR training, its important to consult with your physician before starting a new exercise program. Invest in the proper equipment and start off slow and deliberate. Build up your training from there and you'll discover BFR is a game-changer when it comes to seeing results and reducing the risk of injury to your muscles, joints, and tissue.